Wednesday, 13 June 2012

Coloured water play: drinks for "friends"

Today we decided to make some coloured "juice" for toy animals. I bought some rainbow food colouring and flavouring essences (orange, coconut, strawberry).
In the morning I set up a tray with all things we need: a few short glasses, toy teapot with clear water, food colouring, flavouring essences and also some toy spoons (Alicia wanted them in the short glasses). We also set up a "table" for toy animals - just a large wooden board we had.


First Alicia poured water from the teapot to short glasses. She has already learned how to do that so that water doesn't overflow: "poor and stop" concept I showed her before . I leave for her jugs with water, diluted juice and milk in the fridge which she can poor for herself any time she likes, so she became quite good in pouring lately.


Then she picked the food colouring that she wanted to use: one colour for each short glass. I instructed her to point little bottle with food colouring  down into the glass first before squeezing - to prevent it squirting out to the walls and making mess. She was concentrating so well and did not make any mess at all!


 After colour was done we scented the "drinks" with flavouring essences. I wanted her to use eye droplets for this activity, however I didn't get a chance to buy them, so I helped her adding scents to each glass - she only had to pick which goes where. Then she put a small spoon in each glass and gave the drinks to her stuffed animals - she calls them "friends".


 She had a couple of small spills, but carefully cleaned them with a paper towel.


And then cleaned the table. 


While leaving her animals to "finish drinking juice", she went to preschool and when she came back in the afternoon we continued playing. 


I also got her to smell the glasses and guess what flavour was there: orange, strawberry or coconut? She did guess a few right! (She's smelling the glasses here, not drinking :))


And here cleaning up all the drops again. Surprisingly there were not many!


Then there was time to put toys away and clean up all the glasses. However she wanted to do some more pouring. So I gave her some plastic jars and funnels. She had fun with mixing colours:  "Look mama, adding blue to yellow makes green!"


Then she wanted to sort water by colour: green and blue went to big jar and red went to a smaller jar.


Then she wanted to put "juice" back to short glasses and then to the jars again, and again! 


Then it was time to clean up. I let her wash all the dishes herself and she actually enjoyed the process. 


Then it was time to dry them with a towel. Although not much drying actually happened, she did try very hard!


She did end up going to bed quite let that afternoon (although it is winter in Australia and gets dark pretty early - so not as late as it looks!), and it was rather tiring activity for me to supervise, but we both had a great day. Alicia liked this activity so much so we repeated it to some extend in the next two days.

Friday, 8 June 2012

Weather sensory box.

Rain does not want to go away and I've been "thinking weather" again. I saw this weather themed sensory tub on  "Counting Coconuts"  blog and got inspired to make our own.

This is how I set up our weather sensory box: some rice as a filling, cocktail umbrellas, glass "raindrops" from dollar store, lightning made out of pipe cleaners, cloud and sun cut-out foam shapes, cotton balls, rainbow that we previously coloured with Alicia and another wooden rainbow we had from before. I also added some lego little girls that Alicia loves.


This is what the whole "invitation to play" looked like. It included some of our previous activities with rain and rainbows + some paper strips with Russian words to name all the objects in the tub (good pre-reading activity).


Alicia came from preschool this afternoon to discover playbox. "What's in there?"  


The first thing she did she picked out all the "raindrops" -  sparkly glass pieces. Then she put all the cocktail umbrellas into the foam mat and lay her lego dolls under them like on the beach :). She was pretty much not interested in anything else. She hid all the "raindrops" in her "Dora" thermos and took them to bed :)


Next morning I reset the box and play continued. She took out her "raindrops" and arranged them on the paint tray. She also got interested in the painbow pieces this time and put them together (we practiced this before).


Then she played with the other serving tray - put all the "raindrops" in the middle and little lego dolls on the sides - so cute! I also tried to use Montessory-style "3 part cards" (I love making cards) to learn some more vocabulary, like "sunset", "sunrise", "fog" - some of the pictures I took myself while sailing East Coast of Australia (before Alicia was born). She wasn't interested in them much, but learned the words.


She played with the box a bit more on the 3rd day, but quickly lost interest. I put it away. Then 2 days later she asked to play with it again (I don't have photos though).

What is rain?

It has been raining so much in Melbourne lately, so Alicia started to get quite concerned why we are not going to the park much and asking questions like "Why is it raining?". I recently saw this Watercycle activity on Pinterest and decided to make our own with Alicia, although more simple one without getting into "condensation","precipitation" kind of vocabulary. I remember learning abouth these processes at school when I was 10, and since my daughter is not even 3.5 yet I used simple explanations like:"Rain is water that falls from the clouds in the sky. Water is everywhere: in the rivers, oceans, lakes and puddles. When the sun shines, it turns water into tiny drops and they float up into the sky. There they cuddle together to make clouds. Then clouds get bigger and heavier and can't hold the water any more, so it falls back from the sky and makes rain.".

This is how our picture looked at the end:


This idea came to me when I saw weather cut out shapes on sale in our "Riot Art and Craft" store just for 99 c the whole pack (normally a few dollars).

We started with making a cloud: glueing cotton balls to the cloud cut-out shape:


Then Alicia painted sun shape in yellow and water cut-out in blue:


We left the shapes to dry and continued the next day when we put it all together. Alicia loves stickers so I decided to give her fish stickers to add to the water shapes to make it more interesting.


Then we added water drops going towards the sun stickers (they were part of fish sticker set) and also raindrops stickers - the only once I could find were coloured with dots, but that's ok.


Once we finished I threw in some pre-reading exercise (in Russian - I only use Russian when speaking to Alicia). I wrote the words like "sun", "sea", "drop", "cloud" on pieces of paper, read them out loud to her and got her to place them on the corresponding picture. Then we repeated this exercise a couple of times again in the following days.

The book we used to get explanation about the rain is the one below. I love how simple the explanations are.


Monday, 4 June 2012

Treasure hunt

When I was a little girl we liked to play "treasure" and "secrets" games which included finding pieces of coloured broken glass on the street, dig them in the sand and then look for them later. It was one of the most popular activity in the sandpit. Thankfully now there are much safer options rather than playng with broken glass!. It is also winter here in Melbourne and playing treasure hunt game on the beach is not an option for us. So, here is what we did.

I picked up a few fake gemstones  and shapes, glass decoration figures and wooden numbers  from hot dollar shop, put a few of each kind on the baking tray and covered with sugar. When Alicia came home from preschool I told her there is some treasure hidden in the baking tray under the "snow" and she can to dig it out if she wanted. I showed her that she needs to use the paint brush to discover treasures in the tray.  She was into nothing like this before, so she started digging with rather curious face expression.


Then she started discovering things and her face lit up with smile.


Then she used the brush to clean little treasures from the sugar - totally her idea!


Then she wanted to do it again!


Next day we played this game with rice - this time also she decided she didn't want to use the brush and little glass teddies needed to jump on the "snow" before they get out :)
I also replaced wooden numbers with Russian plastic letters.

Then she wanted to hide the treasures in beans mix from her playkitchen:


And black beans:


Then we played sorting/ pre-reading game with matching object with words (in Russian):


After all these activities our "treasures" needed a wash. So next day we hid them in a soapy water:


Doing this in play area was a mistake so we moved to the laundry:


Alicia was happy discovering treasures and placing them in the clean water (which soon became soapy too).


Cleaning up is a must!


Here are the "treasures" we were playing with:

Monday, 28 May 2012

Мойдодыр

Уже давно хотела сделать Мойдодыра для Алисии,  и вот наконец-то собралась. Я давно пыталась искать идеи в интернете но ничего интересного не могла найти, не только самодельных мойдодыров, но даже игрушечных (типа пластмассовых или деревянных на продажу). Потом мне в голову пришла абсолютно моя идея - сделать его из двух коробок и двух пластмассовых тазиков (покрашенных серебристой краской). Руки и волосы я изначально хотела сделать из старого полотенца, но оказалось что все старые полотенца я недавно отдала в charity пришлось делать их из фетра. Вот какой получился Мойдодыр:


Я не фотографировала никакие подробности изготовления, но мне кажется это и так понятно. Идея очень простая:
1) Берем 2 коробки - одна из под хлопьев для завтрака cheeriors , другая из под салфеток kleenex -та что с дыркой посередине.
2) Обклееваем коробки бумагой (самая скучная часть работы).
3) Для шляпы и для раковины я использовала пластмассовые тазики из набора одноразовой посуды. Они уже были серебристого цвета.
4) Прорезаем дырку в коробке из под салфеток так чтобы туда вошел тазик.
5) Волосы и руки делаем из фетра.
6)Нос (кран) из проволоки для крафта (pipe cleaner).
7)Глаза - из набора глаз для крафта
8) Брови из губки для мытья посуды.
9) Нужен горячий клей чтобы все хорошо держалось (hot glue gun).

Я приготовила все ингредиенты заранее, а склеивали их вместе мы уже с Алисей. Я не сказала ей кого мы делаем и хотелось увидеть в какой момент она догадается - этого не произошло пока мы его практически не закончили. В один момент она воскликнула: "Да это же Мойдодыр!" и лицо ее озарилось широкой улыбкой!

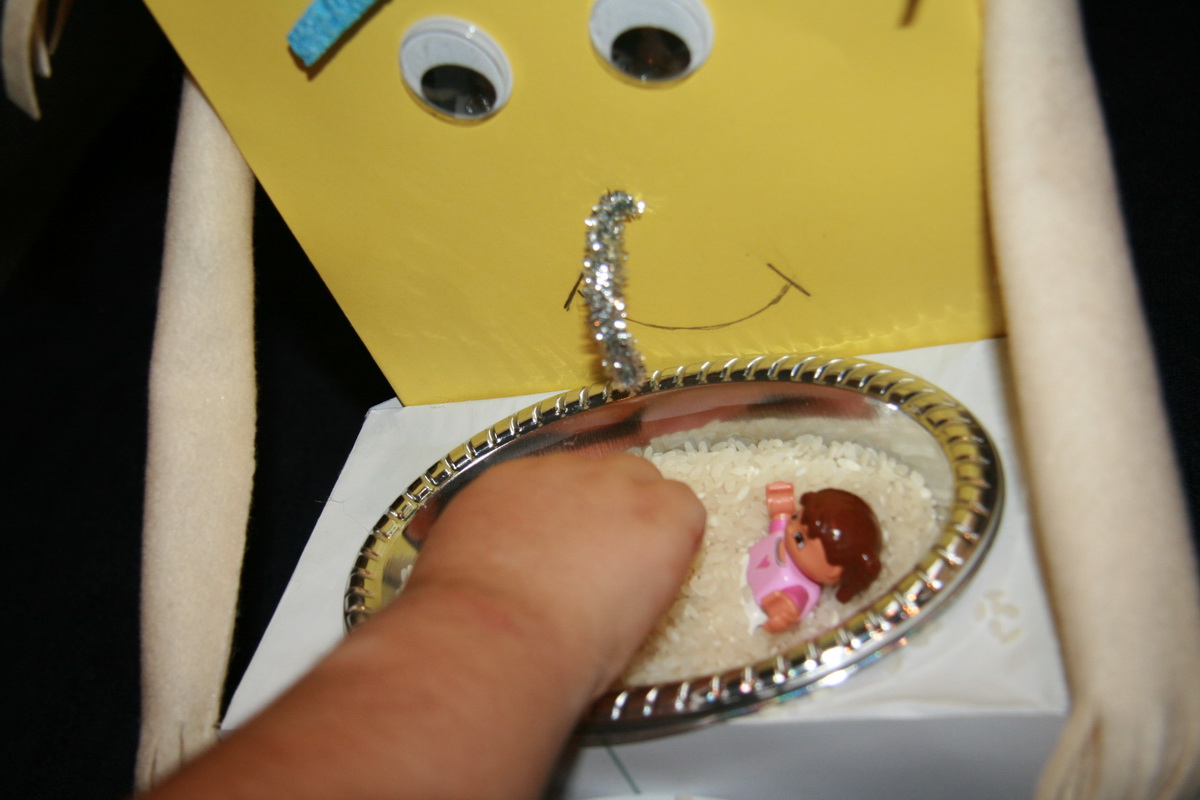
Мойдодыр сразу же стал любимой игрушкой и она "купала" в его "ванной" своих маленьких человечков. Я об этом как-то сначала и не подумала, но ведь его можно использовать как игрушечный умывальник для кукол - это была уже Алисина идея.

 "У него есть ручки!"
 В него можно насыпать макароны!
 У него тазик на голове!
 Можно использовать Мойдодыра чтобы купать маленьких человечков.

 Эта куколка принимает ванну с рисом!

А эти человечки ванну с фасолью (камушками).